Event Tickets With Ticket Scanner Documentation

Table of Contents

What can you do with your Event Tickets with Ticket Scanner for WooCommerce plugin?

Need help selling your tickets on WooCommerce? Don’t worry; we got you! You can now sell your event tickets with our WooCommerce Plugin. Once the plugin has been integrated, the tickets can be sold immediately without any further catch. Additionally, it comes with a Ticket Scanner, using which you can scan the tickets and redeem them directly at the entrance or whenever you like!

The plugin has two components: the Event Ticket and a Ticket Scanner. The Event Ticket assists you in selling tickets for your event. This is where you assign a product ticket list and fill in the relevant information regarding your tickets, which is all you need to get started. The Ticket Scanner, on the other hand, allows you to redeem the tickets. You can use the Ticket Scanner with your smartphone and desktop or PC.

To assist you further, you can find explanatory videos on our YouTube Channel, Vollstart – Serial Code Validator WordPress Plugin. You can also reach out to us on our support email if there are further queries.

How to install the premium plugin?

You need to have both plugins installed. The basic plugin and the premium plugin.

Quick start

Here’s what you need to know to get started with our WooCommerce Plugin: Event Ticket with Ticket Scanner, and you will be selling and validating tickets efficiently in no time!

Adding the Plugin to WordPress

Before anything else, you need to add the plugin to your WordPress. Once it is added, it will automatically be integrated into your WooCommerce features.

Log in to your WordPress account as an Administrator.

  • Then, go to Plugins, and click on Add New.
  • Search for Event Tickets with Ticket Scanner and install it.
  • After installing it, click on Activate, which will allow you to use its features immediately.

Install the premium plugin:

  • Download the plugin after your purchase
  • Upload the ZIP file within your WordPress using the plugin area
  • Activate it
  • Enter the serial within the options area of the plugin to activate it

Note: You need the basic plugin to use the premium plugin. Both have to be installed and active.

Use Cases for a quick start

Event Organizer

Club owners (spa, fitness, etc), theme parks, zoo and others

Adding Tickets to Your Product List

Once the plugin is installed and activated, go to Products. Here, you can add, edit, and delete your products (which will be sold as tickets). If you want to add a new product, go to Products, then Add New. Or edit the existing ones. You can view the product in All Products.

Choose the product you want to sell as a ticket. Scroll down to find the tab Event tickets and code, where you can edit how your ticket numbers are presented to the customers.

Before anything else, you need to check the ‘Is a Ticket Sales’ option for the product you are selling to be a ticket. Other details you can edit include the start date, end date, start time, and end time of the event. Remember that these details will be visible on the ticket. If you want other details to be visible only on the ticket, add them here. In addition, if you want to select or deselect what is shown on the ticket, that can be done in the plugin Options. Below are the options that you can use.

Assigning the Ticket List to the Product

The list is where the generated ticket numbers are stored. A list is automatically generated with the plugin installation. Remember that you need to assign a list to each ticket.

Setting a Format for Your Ticket

If there is a format that you want to apply to your ticket, you can do that by selecting the Use format settings. To make the plugin more adaptable to your liking, you can even set a global format in the plugin Options.

Adding Ticket Description

If you want to add a description for your event, you can do that under Product Description. It allows you to add media as well.

Viewing the Ticket Lists

In the Event Tickets tab, you can view all your tickets. You can view ticket information like Customer Name, Order ID, whether the ticket has been redeemed, and the ticket status. The status shows if the ticket has been used yet or not.

How Can Your Customers View/Download Their Tickets

After the initial steps are done and your product is activated as a ticked, you can start selling immediately. Once a customer buys your ticket, an email with a link to view the ticket bought is sent to the customer’s email. Here, your customers can also download the ticked PDF. Later, the ticket can be redeemed by scanning the detail page or using the ticket PDF.

Validating the Tickets at the Event Entrance

Validating the tickets is made highly convenient with the Ticket Scanner. You only need to scan the QR code on the customer’s ticket, which will redirect you to a page showing ticket details. It will allow you to validate the ticket and see if it is valid.

Sell tickets for a service like a Spa, Club or similar

It is not only possible to sell event tickets, but also to sell tickets with a specific lifetime or an amount of usage.

You Can Avail the Premium Version for More Control & Security

You can access the premium features once you have activated them in Options. The premium features add advanced functionalities to the plugin, making ticket selling a more engaging experience.

Activating the Premium Features

You can activate the premium features in Options. For activation, you need to enter your premium serial number, obtained after you purchase the plugin’s premium version.

If you are unaware of the serial number, despite having purchased the premium version, feel free to contact us at support@vollstart.de, and we’ll be happy to assist!

Explore the Plugin’s Key Functionalities (Options)

Our event Tickets with Ticket Scanner plugin allows you to add new functionalities and features to your WooCommerce platform. As a result, you can sell tickets for all kinds of events, while validating and scanning the tickets is made ever so easy with the Ticket Scanner. The significant functionalities listed below assist in making the plugin more personalized to your needs and make selling tickets a job more engaging and fun!

To make your experience more convenient, the features have brief descriptions throughout. They will help you understand the “why” behind the functionalities.

  • Display Options
  • Access
  • Ticket Scanner
  • WooCommerce Ticket Sale
  • Ticket PDF Settings
  • Attach the Ticket PDF to the Purchase Email (Premium Feature)
  • Customize the labels
  • Order Ticket Detail View
  • Adding a Redirect Page
  • Customize the Event Flyer to your Preferences
  • Scanning the Event Ticket
  • The Event Ticket
  • Ticket Badge
  • Using the Calendar Feature (the ICS File)
  • Displaying Ticket Information on User Profile
  • Validating the Tickets
  • Styling Options for the Validation Form
  • Ticket and Code Validation Messages
  • Additional Validation Message
  • Redirects
  • Webhooks
  • Tracking User IP (Premium Feature)
  • IP Log History
  • Product Code Assignment
  • Displaying Tickets to the User
  • Using Replacement Tags
  • Get Protection against Brute Force Attacks with the IP Blocker (Premium Feature)
  • Control the Expiration and Validity of the Tickets (Premium Version)

Product variants

Product variants have various benefits, especially for selling different time slots or categories. Understanding the importance of product variants, the plugin supports and allows users to utilize them. As a result, the ticket details and PDF comprises details from the main product and product variant.

The event time can also be printed on the variant product. This is most suitable for tickets having the same time. You can activate the Date is for all variants checkbox to have the time of the event printed on each product variant.

Note that the short description is only used for non-variant products. With variant products, the description varies. The description of that specific variant is displayed.

Moreover, you can control if the variant type name should be displayed on the PDF ticket in the Options tab.

In addition, you can opt out of product variants, in which case the product will not be a ticket. This could be helpful for different event categories where not all product variants require a digital ticket.

  1. Choose Variable Product from the drop-down list.
  2. Select Variations.
  3. Check the box next to This variation is NOT a ticket product.

Redeem Logs (Premium Feature)

Redeemed logs are there to help you examine the statistics of the redeemed tickets. You can also download these statistics. You can find the Ticket Redeemed Logs in the Event Tickets box on the product page. You can view the logs or download a CSV file.

Even if you reuse the product or the product is not assigned a venue, you can use the date in the redeemed logs to determine the redeemed tickets. The logs serve as a way to browse through the redeemed tickets and help in unusual scenarios.

Ticket Sale WooCommerce

You can sell now Tickets with WooCommerce using the Serial Code to generate Ticket numbers. You have also a Ticket Scanner, that allows you to redeem the tickets on the entrance. Fast and secure.

Quick Overview of the Basic Plugin Functionalities

The global settings allow you to set up a logo, banner and background image for your PDF ticket.

With the premium version you can overwrite this on the ticket list level and on the product level. The ticket list level overwrites the global settings, the product level overwrites the ticket list and global settings.

Shortcode to display users assigned tickets and codes

You can display the assigned (to a user registered) serial codes within a page. Use the following shortcode for this. [­sasoEventTicketsValidator_code]

Shortcode validator optional parameters

Use your own form

You can use your own HTML input, output and trigger component for the check.

If you add the parameters (all 3 mandatory to use this feature), then the default input area will not be rendered.

				
					[ sasoEventTicketsValidator inputid="" triggerid="" outputid="" ]


inputid

The component with the set HTML-ID will be used as the input element. It need to be an HTML input element.

We will access the value-parameter of it.

				
					[ sasoEventTicketsValidator
    inputid="" 
    triggerid="" 
    outputid=""
]


triggerid

The onclick event of the component with this HTML-ID will be replaced by our function in order to call the server validation for the code.

				
					[ sasoEventTicketsValidator
    inputid="" 
    triggerid=""
    outputid=""
]


outputid

The component with the provided HTML-ID on this parameter will be used for the server answer – the output.

It cannot be empty. If you want to hide the output, hide it using css style commands.

The content of this component will be replaced by the server result after the check . We will use the innerHTML property of it, so use a DIV, SPAN, TD or similar for best results.

If you need to control the form depending on the result of the serial code check, then please consider using one or both of the additional optional parameter for your own JavaScript callback functions.

				
					[ sasoEventTicketsValidator
    inputid="" 
    triggerid="" 
    outputid=""
]


Use your own JavaScript callbacks and gain more control

You can add JavaScript function names, that are called before and after the check.

Both parameters are optional and not required.

				
					[ sasoEventTicketsValidator jspre="" jsafter="" ]


These parameters can be combined with the input and output parameters.

jspre

If you want to control or manipulate the input before it is sent to the server, then use this parameter.

The function will be called. The input parameter for the function will be the code.

If your function returns a value, than this returned value will be used. If nothing is returned or an empty string, then the entered code of the user will be used.

				
					[ sasoEventTicketsValidator 
    jspre="myCodePre" 
    jsafter="" 
]


Example function

Add your JavaScript code to your page, so that it can be called from the serial code plugin. Make sure the function name your are using for the jspre-call is matching, the jspre attribute value. The input parameter is a string with the user entered code.

				
					function myCodePre(myCode) {
    // console.log(myCode);
    return myCode;
}


jsafter

The function will be called. The input parameter will be the result JSON object from the server.

The content differs (depending on the activated options) and can be extended in the future. Please inspect the result first, before relying on the available property.

If you want to use the result as a form controlling mechanism check for the returned property: data.valid

The data.valid === 1 is true, if the serial code was valid and unsed.

				
					[ sasoEventTicketsValidator 
    jspre="" 
    jsafter="myCodeAfter"
]


Example function

Add your JavaScript code to your page, so that it can be called from the serial code plugin. Make sure the function name your are using for the jsafter-call is matching, the jsafter attribute value. The input parameter is a JSON object returned from the server after the serial code was evaluated.

				
					function myCodeAfter(data) {
    // console.log(data);
    if (data.valid === 1) {
        // do your thing
    }
}


Worpress filters for the pre and after check option

You can use the “add_filter” function to register your PHP functions. They will be called and expected a specific return value. With this option you can extend the serial code validation check by yourself.

Before the code check pre

This filter will be called right after the parameter check. You can change the $data[‘code’] before it is used to perform the internal pre checks.

				
					add_filter('saso_eventtickets_beforeCheckCodePre', 'myfunc', 20, 1);

/**
* param $data assoc array contains the code from the validator form $data['code'];
*/
function myfunc($data) {
    $code = $data['code'];
    return $data;
}


Before the code check

This filter will be called after some initial checks are passed. After this the code will be evaluated.

				
					add_filter('saso_eventtickets_beforeCheckCode', 'myfunc', 20, 1);

/**
* param $data assoc array contains the code pre analyzed code $data['code']
*/
function myfunc($data) {
    $code = $data['code'];
    return $data;
}


After the check pre

The check is performed and the serial code is evaluated. The code object is available, but only filled if the serial was found. The status can be checked. This filter is called before the additional after operations are executed, like IP block, status messages and more.

				
					add_filter('saso_eventtickets_afterCheckCodePre', 'myfunc', 20, 1);

/**
* param $codeObj contains the serial if found
*/
function myfunc($codeObj) {
    // print_r($codeObj);
    // echo $codeObj['status'];
    // echo $codeObj['_valid'];
    // echo $codeObj['aktiv'];
    return $codeObj;
}


After the check

This filter will be called after all the additional operations are done. The webhook trigger is send.

The returned values to the validator form will be $codeObj[‘_valid’] and $codeObj[‘_retObject’].

				
					add_filter('saso_eventtickets_afterCheckCode', 'myfunc', 20, 1);

/**
* param $codeObj assoc array
*/
function myfunc($codeObj) {
    // echo $codeObj['_valid'];
    // var_dump($codeObj['_retObject']);
    return $codeObj;
}


HTML styling and CSS

The frontend will be rendered by the Javascript file. The elements will have css classes, that you could override.

The actual used CSS file can be view here: Open the CSS file

				
					<div id="sasoEventtickets">
   <div class="sngmbh_container">
      <div class="sngmbh_container">
         <div class="sngmbh_input-group sngmbh_mb-3">
            <input required="" type="text" class="sngmbh_form-control sngmbh_mb-2" data-input="sasoEventticketscode" placeholder="XXYYYZZ">
            <div class="sngmbh_input-group-append">
               <button type="submit" data-btn="sasoEventticketsbtn" class="sngmbh_btn sngmbh_btn-primary sngmbh_mb-2">Check</button>
            </div>
         </div>
      </div>
      <div></div>
   </div>
</div>


Form validation look and feel is controled by 2 css classes:

				
					.sngmbh_is-invalid, .was-validated .sngmbh_form-control:invalid {
    border-color: #dc3545;
    padding-right: calc(1.5em + .75rem);
    background-image: url(data:image/svg+xml,%3csvg xmlns='http://www.w3.org/2000/svg' width='12' height='12' fill='none' stroke='%23dc3545' viewBox='0 0 12 12'%3e%3ccircle cx='6' cy='6' r='4.5'/%3e%3cpath stroke-linejoin='round' d='M5.8 3.6h.4L6 6.5z'/%3e%3ccircle cx='6' cy='8.2' r='.6' fill='%23dc3545' stroke='none'/%3e%3c/svg%3e);
    background-repeat: no-repeat;
    background-position: right calc(.375em + .1875rem) center;
    background-size: calc(.75em + .375rem) calc(.75em + .375rem);
}
.sngmbh_is-valid, .was-validated .sngmbh_form-control:valid {
    border-color: #28a745;
    padding-right: calc(1.5em + .75rem);
    background-image: url(data:image/svg+xml,%3csvg xmlns='http://www.w3.org/2000/svg' width='8' height='8' viewBox='0 0 8 8'%3e%3cpath fill='%2328a745' d='M2.3 6.73L.6 4.53c-.4-1.04.46-1.4 1.1-.8l1.1 1.4 3.4-3.8c.6-.63 1.6-.27 1.2.7l-4 4.6c-.43.5-.8.4-1.1.1z'/%3e%3c/svg%3e);
    background-repeat: no-repeat;
    background-position: right calc(.375em + .1875rem) center;
    background-size: calc(.75em + .375rem) calc(.75em + .375rem);
}


The ajax call progress is rendered dynamically with the CSS rule: “lds-dual-ring“. It will be injected if it is not defined. To overrule this look and feel, just create the CSS rule with your values.

The progress wheel (spinner) is rendered by: 

				
					<div id="sasoEventticketsspinner">
    <span class="lds-dual-ring"></span>
</div>


Here is the default CSS rule of the progress wheel:

				
					.lds-dual-ring {
    display:inline-block;
    width:64px;
    height:64px;
}
.lds-dual-ring:after {
    content:" ";
    display:block;
    width:46px;
    height:46px;
    margin:1px;
    border-radius:50%;
    border:5px solid #fff;
    border-color:#2e74b5 transparent #2e74b5 transparent;
    animation:lds-dual-ring 0.6s linear infinite;
}
@keyframes lds-dual-ring {
    0% {
        transform: rotate(0deg);
    }
    100% {
        transform: rotate(360deg);
    }
}


Display registered information to a code

You can ask the user to register to a code after a successfull restriction code validation check.

You can also display this information to the next user who checks this code. 

This allows you basically to a database, where users can check a restriction code. Maybe printed on a certification or personal ID.

IP block against brute force attacks (premium only)

You can activate the IP blocker to protect your server from bruteforce checks. That way they cannot try out serial codes untill they found a correct one.

IP log history

You can activate the IP log history and track the usage. You will see the IP address and the used code for the check. The code status shows you the return value of the validation check.

You can delete the history also untill a date to clean up your database and free some space.

FAQ's

No. The plugin is only for one domain.

Up to 3 Sub-Domains are fine, as long as they are used for testing reasons.

Your serial will be checked against the domain and how many different sub-domains are calling the update. 

Yes. You can copy and paste your codes within the “adding codes” area. No direct file import possible.

You have the option to ask the user to enter a value once the code was successfully checked. Activate this option within the option area.
Please note, that you can ask for one value. It will be stored to the code. You can define the labels for this in the option area.
 
We offer also JS hooks, so that you can add your own JS code to be executed before and after the serial code check.
 

Yes, but only with the premium plugin.

The premium plugin offers: “Save IP address of user using the code validation check on your page”
The data is stored into your database.

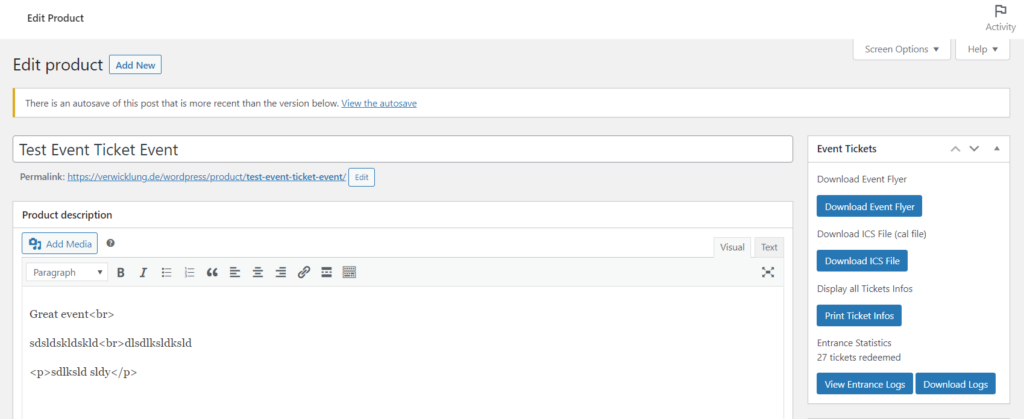
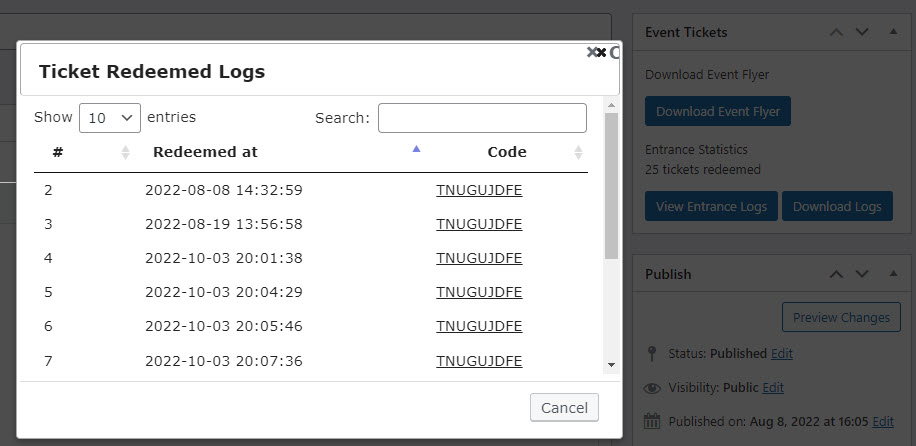
Yes, the confirmed checks are displayed on the code details and is labeled “Confirmed count:”

Yes. Unlimited tickets numbers. Your server is the limit.

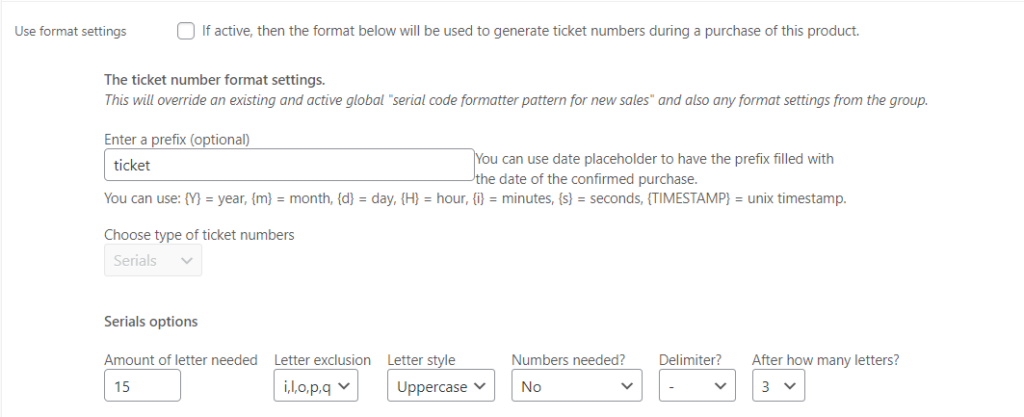
If you plan to have a lot of tickets, then we recommend to choose a longer ticket number within the options, to make sure you are not running out of possible numbers.

No.

The ticket scanner is making ajax calls to your wordpress installation to update the database and check if the ticket is still valid.

It could have been redeemed already on another entrance.

This is not supported yet.

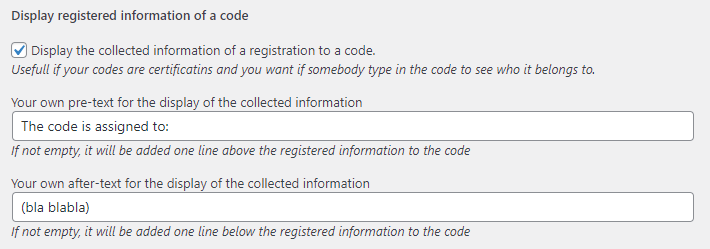
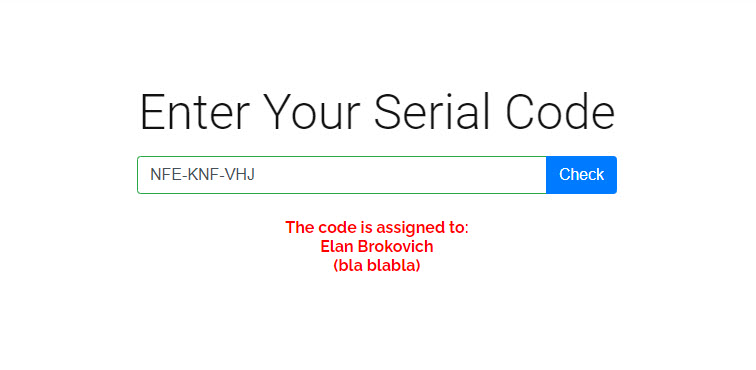
But we kept the words on the ticket to a minimum. And most of the action (buttons, links) and title lables can be changed by you within the plugin option area.

The plugin is not coming with its own payment methods. Selling the ticket is a responsibility of WooCommerce and so you can use all the available payment methods for it.

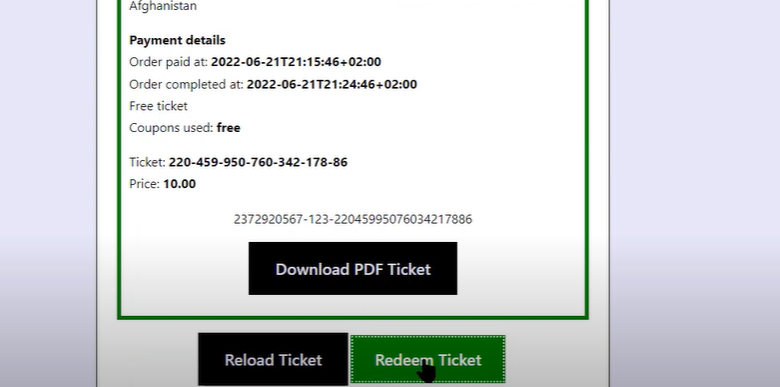
If you want to redeem a ticket and receive this message, then the ticket order is not yet set to “complete”.

To prevent ticket to be redeemed even if they are not paid yet (like for check or bank transer), checks the system the order status.

By default only “completed” orders are accepted.