Our event Tickets with Ticket Scanner plugin allows you to add new functionalities and features to your WooCommerce platform. As a result, you can sell tickets for all kinds of events, while validating and scanning the tickets is made ever so easy with the Ticket Scanner. The significant functionalities listed below assist in making the plugin more personalized to your needs and make selling tickets a job more engaging and fun!
To make your experience more convenient, the features have brief descriptions throughout. They will help you understand the “why” behind the functionalities.
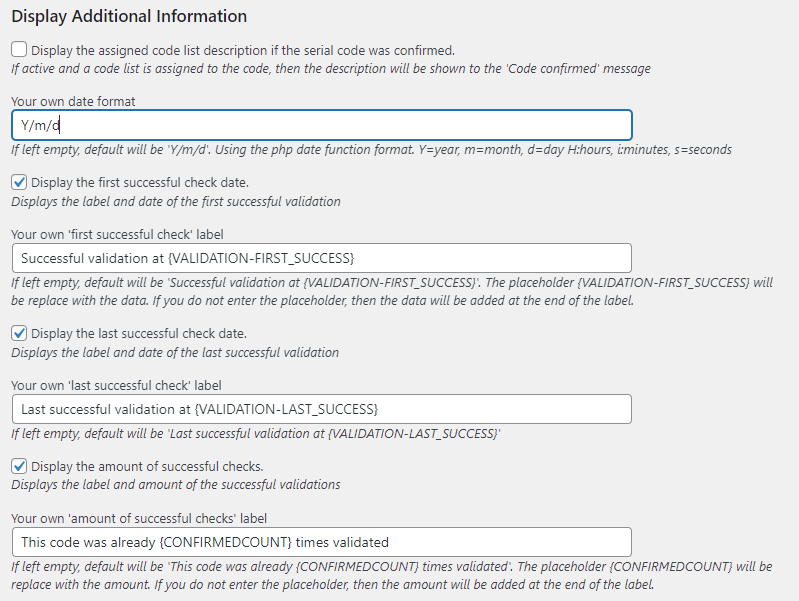
The display options allow you to modify some of the presentations. It includes changing the date format from the default (i.e., y/m/d). You can change the format to whatever you prefer. Similar is the case with the time format. The default is h:i:s, where h is the number of hours, i is the number of minutes, and s is the number of seconds.
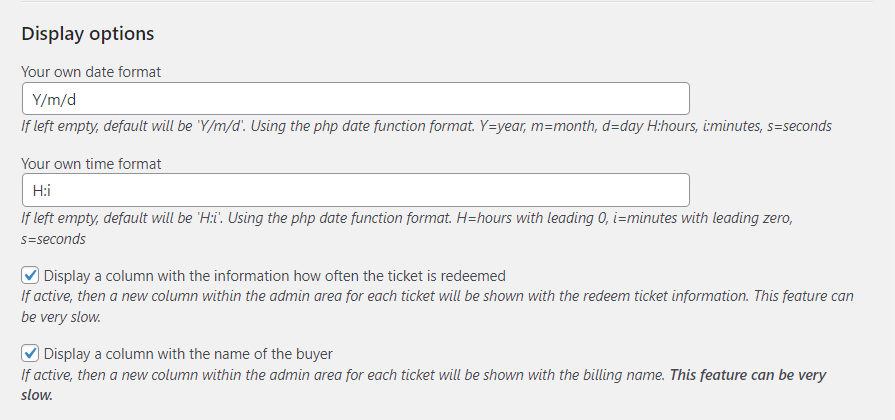
More options include displaying a new column within the admin area to show the Redeem Ticket Information for all tickets. Please note that this feature might slow down the overall speed.
You can control and manage access to the admin area. In Options, you can activate or deactivate under Access.
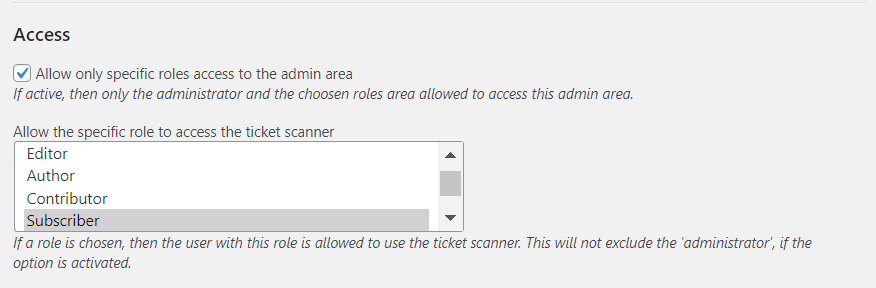
If selected, access to the admin area is limited to the Administrators and other roles that you may allow. You can choose the roles allowed from the list.
Important: Some installations do not allow a direct access to the plugin folder. In this case please create a page and add the shortcode for the ticket scanner.
Shortcode for the ticket scanner in case you do not want to use the default ticket scanner page: [sasoEventTicketsValidator_ticket_scanner]
The Ticket Scanner is one of the significant components of our plugin. It makes scanning and validating the tickets hassle-free for its users. In addition to scanning and validating the tickets, you can manage crucial aspects like who can access the Ticket Scanner and under what conditions the ticket can be redeemed. Here’s everything you can control regarding the Ticket Scanner in the Options tab:
Selling tickets requires assigning a ticket list to a product. This allows a ticket number to be generated. You can also use an existing ticket from the list. This information is essential to the customer’s purchase information and is printed for the customers to view.
Go to the Options tab to enable or disable the following functionalities.
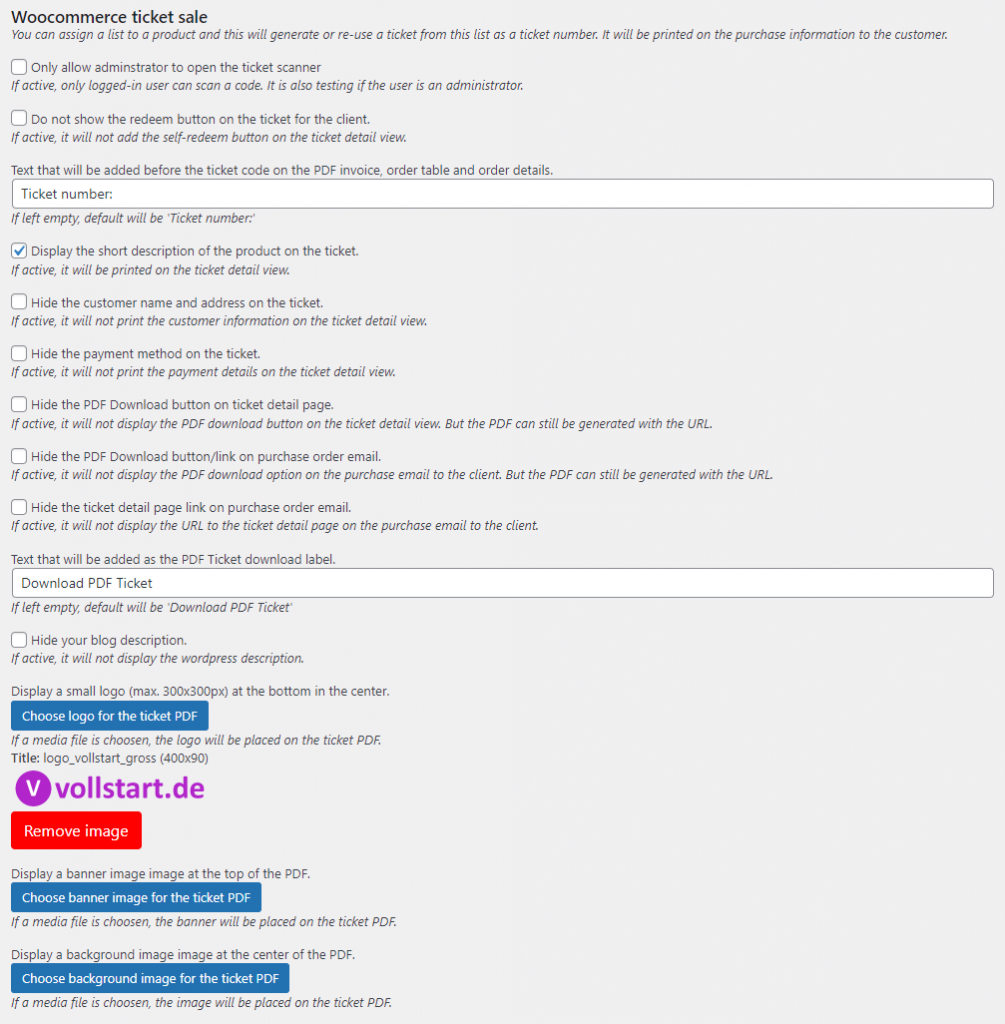
The ticket PDF generated and used has many elements like font size etc. You can modify that in the Options tab under Ticket PDF Settings. You can also choose to hide/display.
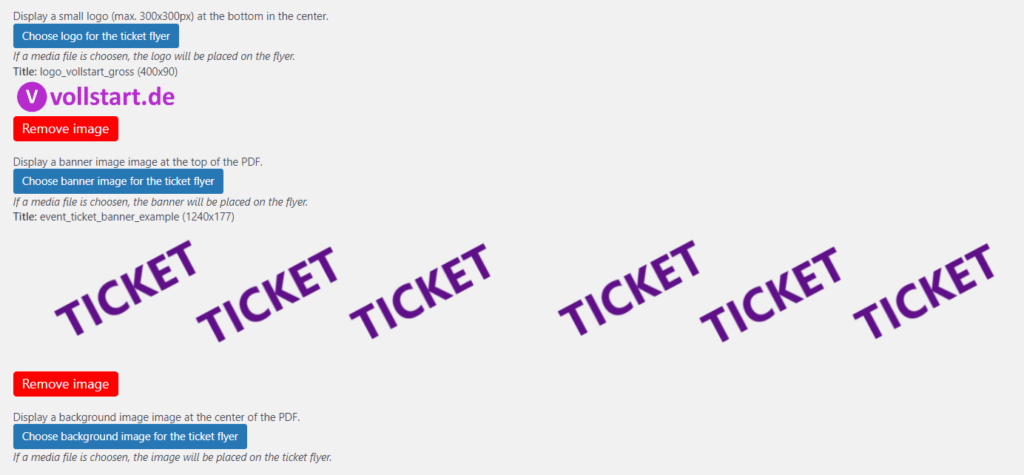
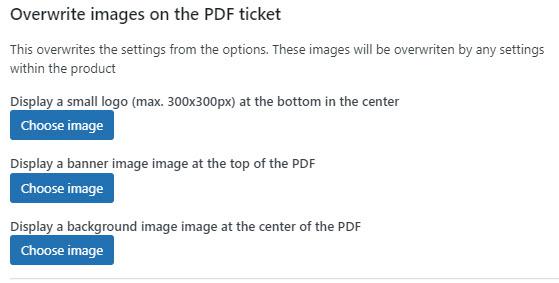
You can upload the logo, banner, and background images under the guidelines in the Options tab adjacent to each feature.
If you have a premium version of the plugin, you can use this feature to generate a PDF emailed to your customer for each ticket. For example, if three tickets are bought, then three tickets are attached to the purchase email.

Note that the PDFs are only attached if your customer has bought under 21 tickets. This is to prevent the timeout from hindering the purchase email from being generated, as the email gets too big for the mailbox to handle.
You can even choose the type of email that should contain the ticket PDF. For example, if the Invoice to customer emails is selected, the ticket PDF will only be attached to the Invoice to customer emails.

You can customize the labels printed on the tickets for specific details such as Location for event location and payment details. To edit these, go to the Options tab and change the labels according to your liking under Ticket Translations.
For example, to display text for the maximum times a ticket has been redeemed on the Ticket PDF, you can enter “You have used this ticket {REDEEMED_AMOUNT} of {MAX_REDEEM_AMOUNT},” where {REDEEMED_AMOUNT} and {MAX_REDEEM_AMOUNT} are used to display the numbers.
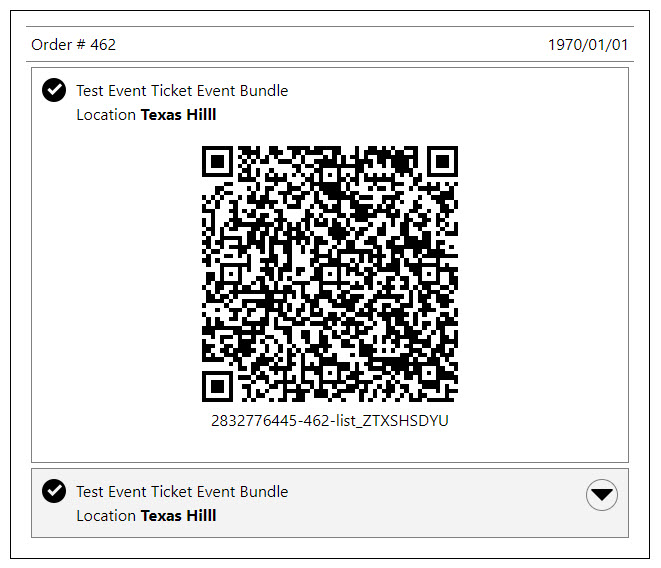
You can add a button to the order email that will open the order ticket detail view. This view contains all QR codes and simple ticket information. The view allows a quick scan of all tickets. The focus is on the QR codes.


With this view you can scan and redeem faster. Your customer clicks on the ticket entry and the QR code is displayed.
This is useful if you want to enable self-validation for the tickets by the customers. You can redirect them to another page, a form, or a document to implement this. For this to be implemented successfully, the feature ‘Do not show the redeem button on the ticket for the client‘ under Ticket PDF Settings has to be disabled.
Go to the Options tab and then Ticket Redirect. You can enter the URL in the space provided, and after the customer redeems a ticket, they will be automatically redirected to the URL entered. You can use the tags, including
Also, the tags listed under the Replacement tags can be utilized.
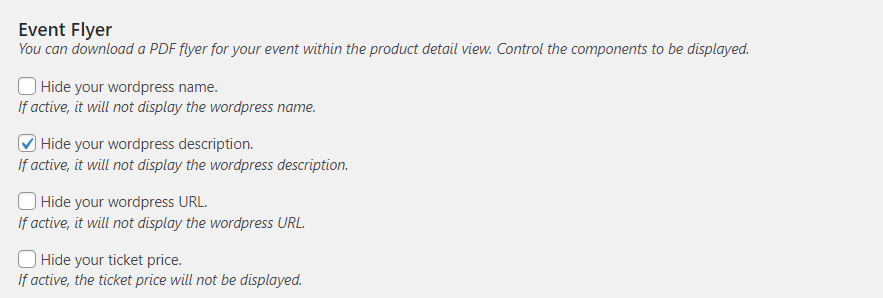
The Event Flyer is an integral part of the event. While acknowledging this, we allow the users to download a PDF flyer of their respective events from the Product Detail View. The QR code on the flyer contains the URL to the Ticket Details Page.
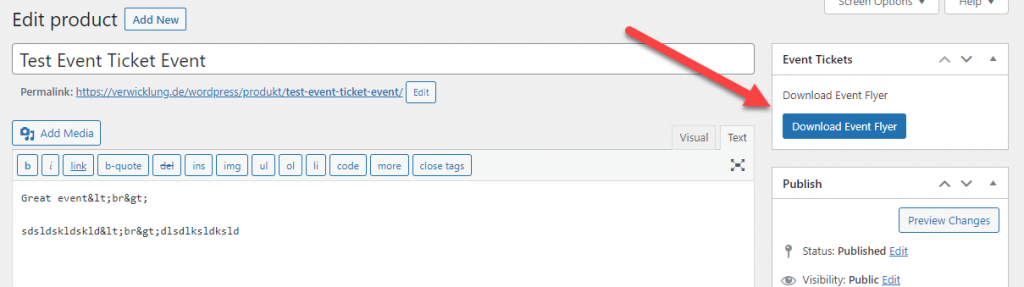
Moreover, in the Options tab, under the Event Flyer, you can control the information displayed on the Flyer. You can hide/unhide
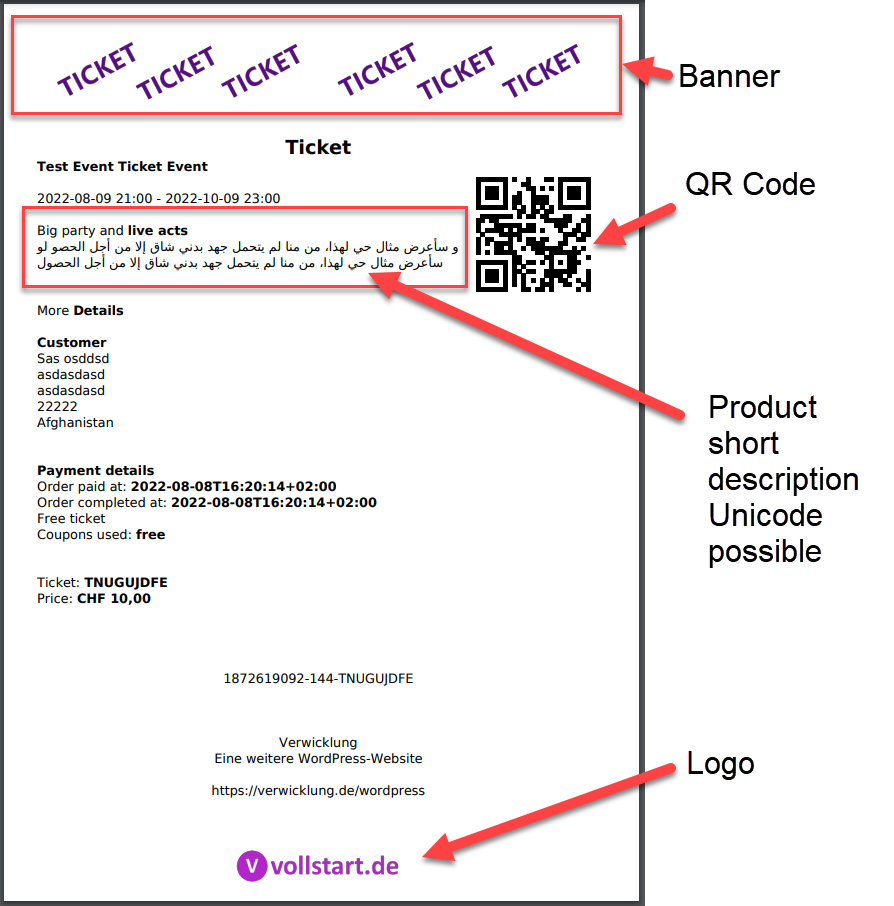
In addition to this, you can choose the images for the logo, banner, and background of the Event Flyer. The product description can also contain Unicode or HTML.
You can download a event or party flyer within the product detail area. You can also add a banner, log and a background image to the PDF. The QR code contains the URL to the detail page of the product. The product description an contain unicode and HTML. You can hide the price if needed.

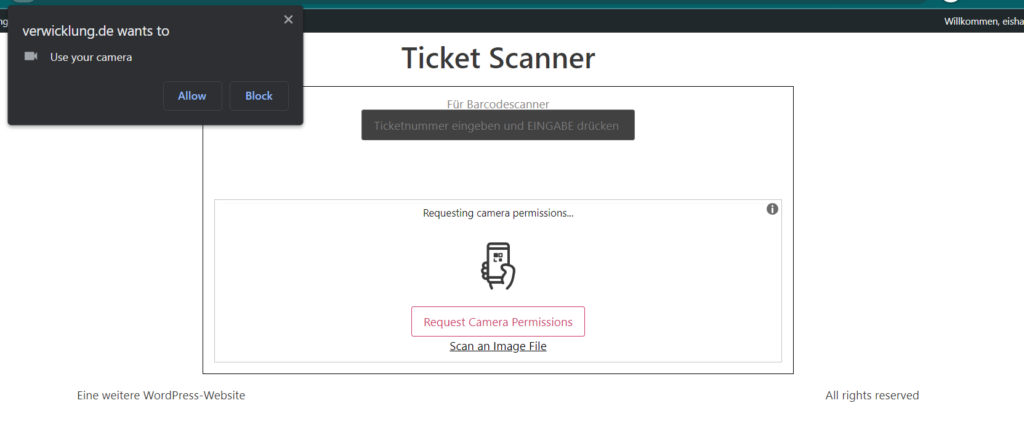
The built-in ticket scanner allows you to scan the QR code of the ticket. Once it is scanned, it will load the ticket information. You can redeem the ticket with the button at the bottom.
The plugin allows you to customize the Event Ticket by adding logo, banner, and background images. You can also edit other details like descriptions, which contain Unicode and HTML. The QR code represents the ticket number scanned at the entrance for validation.
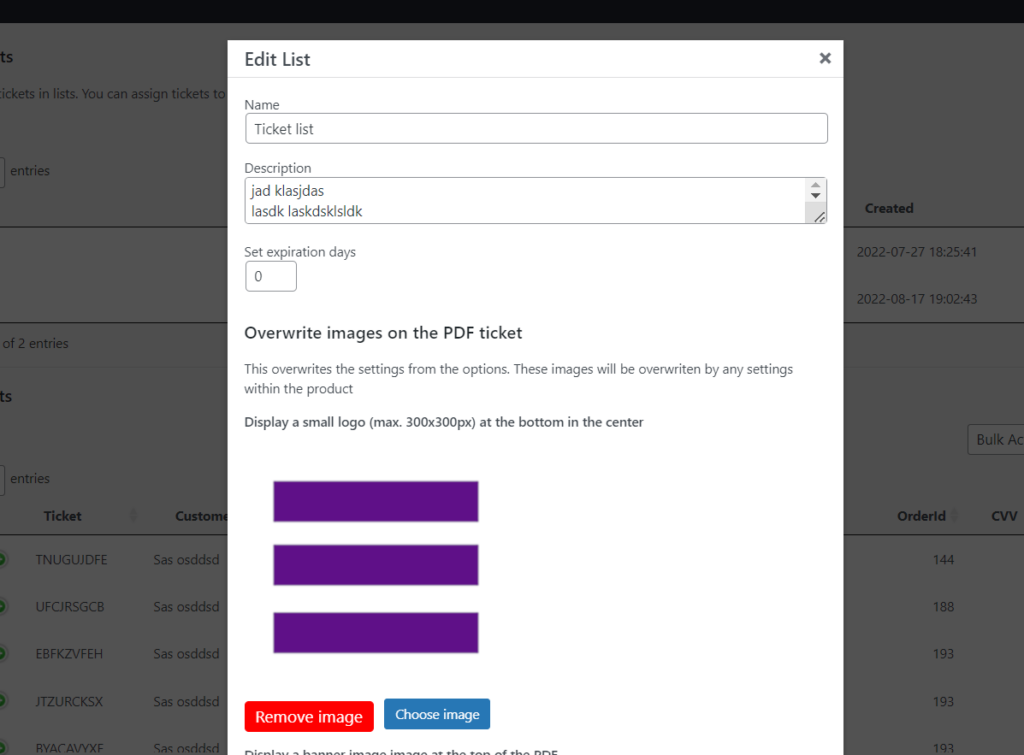
The global settings allow you to set up a logo, banner, and background image for all your ticket PDFs.
By availing of the premium version, you can overwrite this on the ticket list level and the product level. The ticket list overwrites the global settings, whereas the product level overwrites the ticket list and global settings.
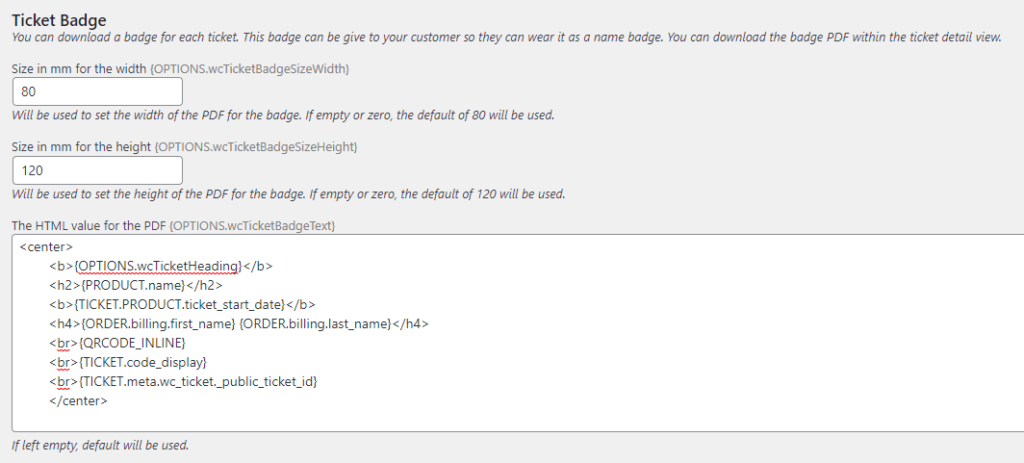
You can design and download your ticket badge for each ticket. This allows you to hand out your customer a badge with their name at the entrance. The editor gives you the maximum freedom to decide what to display on the badge. The badge will be rendered into a PDF. You can download the Ticket Badge within the ticket detail area in the admin.
For the editor you can use values of the options, ticket, ticket meta data, order and the product. Add the tags in braces and they will be replaced during the rendering. The full list of possible tags are listed within the options area.
Calendar features are particularly beneficial when events are involved. Everyone finds it convenient to reserve a slot on their calendars hassle-free. With this thought, we have created a feature allowing your customers to access the ICS Calendar file containing the event information (like date). This will enable your customers to add your event to their calendars directly from the email. An ICS calendar file can be attached to the purchase email sent to the customers once they buy your ticket. You can also download the ICS file directly from within the Product Detail View from the WooCommerce backend.
You can also modify the label on the ICS file download button and choose to hide/unhide the button itself. Other features like hiding/unhiding the event date on the purchase order email and product detail page are also available.
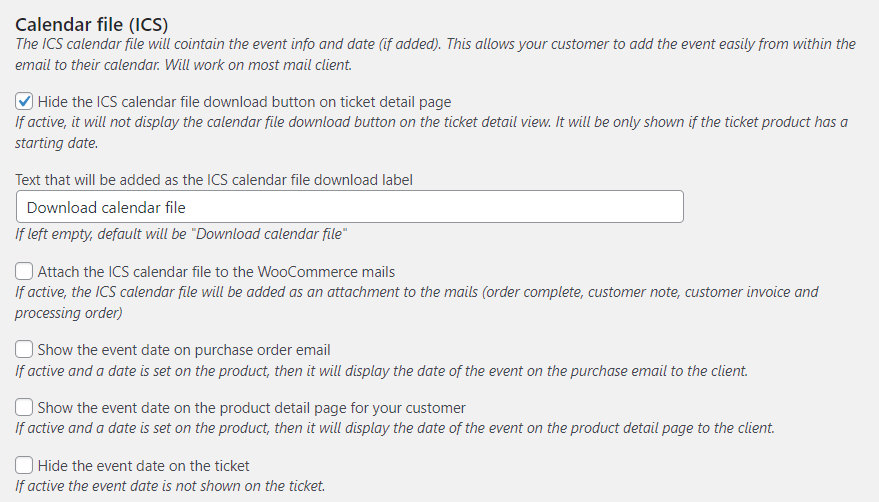
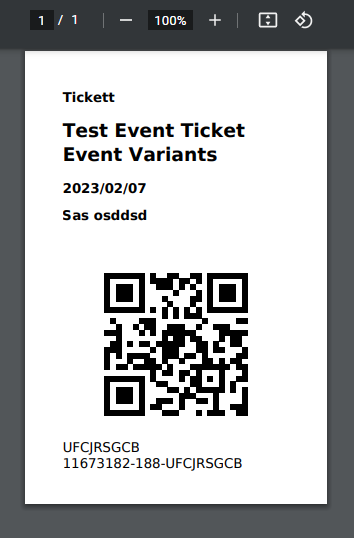
In the Products tab, you can add a start and end date to your ticket information. You can change the settings in the Product Detail View. This makes ticket selling more customized and personalized.
The date can also be displayed on the purchase email and Product Detail Page. Note that if you leave out the end date for the event in the Product Detail View, the event will be added as a day entry to the customer’s calendar.
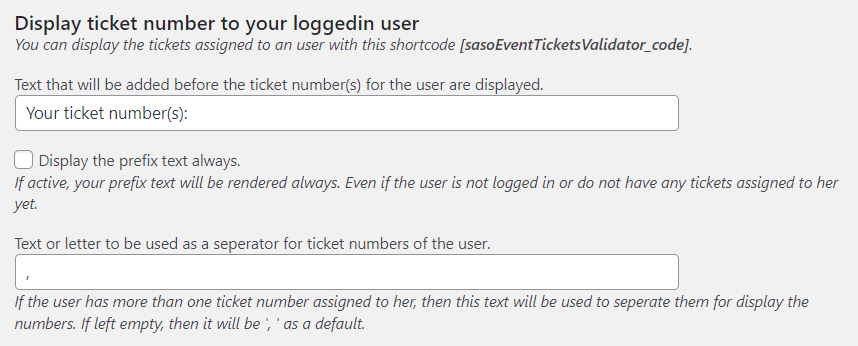
If you want the registered/bought ticket numbers to be displayed on the user’s profile, you can make it happen by going to the Options tab and then the User profile.

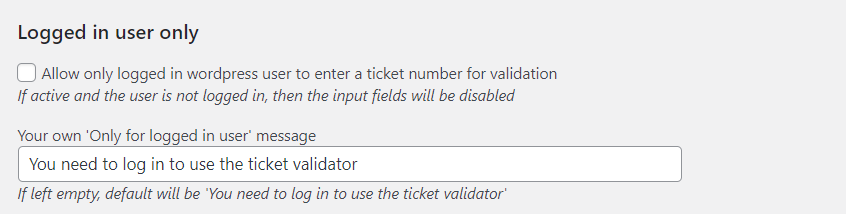
The logged in user only section in the Options tab can be sued if you want to limit the personnel validating ticket to only those logged in to WordPress.
Validating the tickets is a crucial part of the event. The Ticket Scanner with our plugin makes it extremely easy to do the job quickly. However, if you want the customers to validate their tickets using a validation form, that is equally as easy to implement with our plugin.
In the Options tab, under Validation Form and Validation Messages, you can turn the validation form into a more personalized version for the customers to have a more engaging and guided experience.
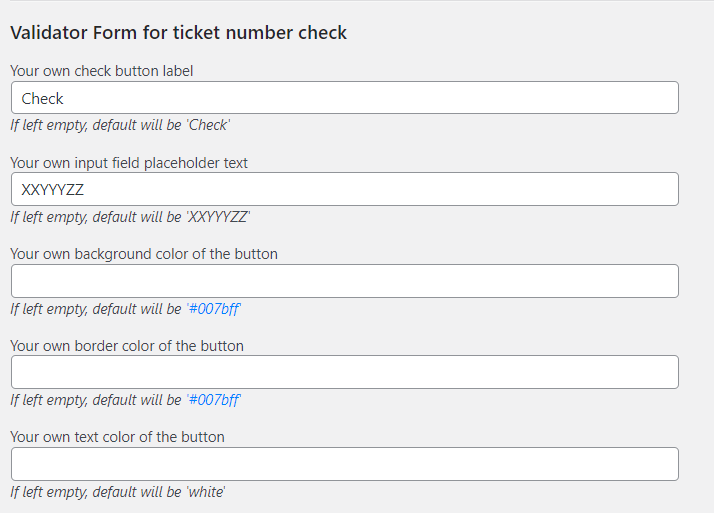
You can modify the styling aspects of the validation form like labels, background color, and text color under Validator Form for ticket number check in the Options tab. If you have a good grasp of CSS, you can add the settings to the form to improve the presentation.
The user will have to add a shortcode to validate the codes. The form consists of an input field and a button. You can customize them according to your liking.
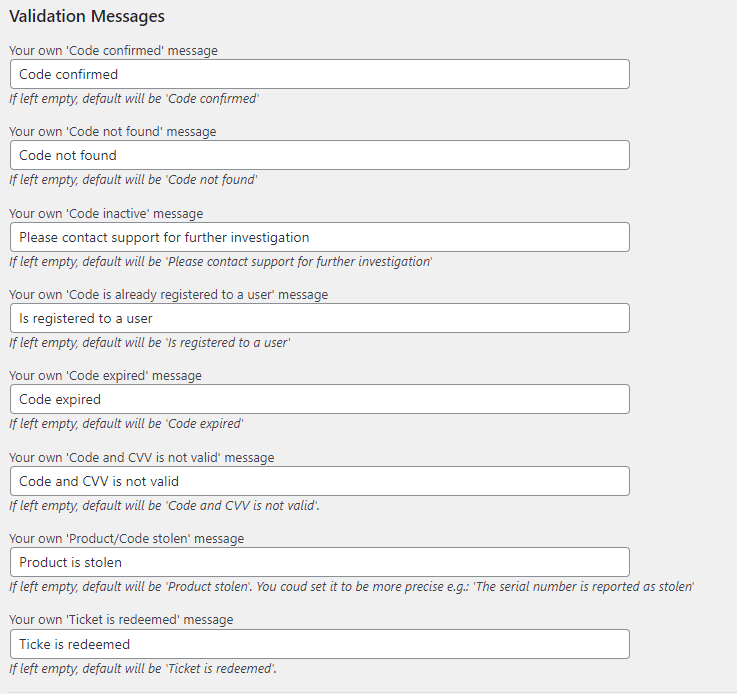
These features regarding the Validation Messages in the Options tab allow you to enter messages of choice that are displayed when particular events occur. These include ticket confirmed, ticket inactive, and ticket expired events that are supposed to generate a message for the user to comprehend. You can enter your messages displayed to the user when these events occur.
The URLs can be called using two methods, which include
You can implement redirecting in two ways.
1. Ticket Redirection
If you want your customers to be redirected to a particular page or URL when they redeem a ticket, this feature is for you! To enable this, you must activate redirecting the user after redeeming the ticket feature under Ticket Redirect in the Options tab.

The URL can be entered as an absolute URL (e.g., https://vollstart.com/) or a relative URL (e.g.,/page/). This URL is executed on the front end. The user is redirected after they have entered a valid code. The manner of redirect depends on whether you have added a button label.
Note that the features listed under the Ticket Redirect section are associated with the Ticket Redeem option on the ticket detail page (or the product detail page).
2. Ticket Redirection
User Redirection is quite similar to ticket redirection, except in this case, the user is redirected from the ticket validation form. The Ticket Redeem option on the validation form takes the user when selected, to the URL you enter.
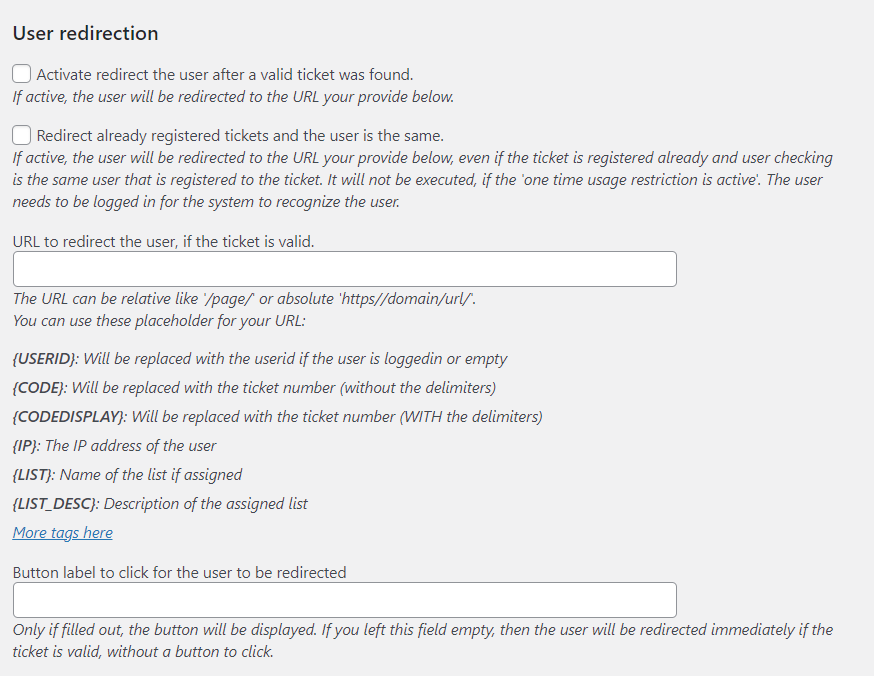
You can add the redirect URL and a button label. Like ticket redirection, the URL can be entered as an absolute URL (e.g., https://vollstart.com/) or a relative URL (e.g.,/page/). This URL is executed on the front end. The user is redirected after they have entered a valid code. The manner of redirect depends on whether you have added a button label.
With webhooks, you can alter how your server responds using custom callbacks. Our plugin allows you to enter URLs for each step (or call) carried out by the server during validation. In essence, WordPress calls the URLs you have entered when calls are made. This feature can inform other servers when the validation process is triggered.
You can make use of 6 placeholders to construct the call, including
Note that the placeholders are case-sensitive. It is recommended that you copy and paste the placeholders (along with the brackets) into your URL.
In addition, you can use the following replacement tags in your text messages and URLs for the meta code values.
Here is an example for your understanding.
Consider the details below.
User ID (empty if the user is not logged in): User ID
Display-Code: NYA-ZER-TER
Code: NYAZERTER
Name of the list the code is assigned to myList
IP of the user: 1.2.3.4
If redirected, the browser will go to
https://vollstart.com/anotherService/myList/NYAZERTER/?code=NYA-ZER-TER&ip=1.2.3.4
If the webhook URL is called, your server will call the URL in the background.
This premium feature gives you more control over how your tickets are used. You can track the IP address, time, and code against each ticket.

This feature allows you to track the usage when activated. You can view the IP address, the used code, and the code status (which shows you the return value of the validation check).
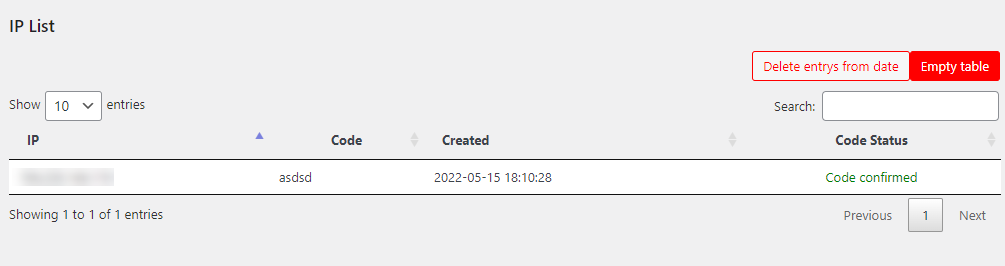
The log history can be deleted up to the desired date to free up space from your database.
Want to profit from our plugin? Here is what you can do.
Whenever you assign a code list to a product, a new code is generated with the purchase and is assigned to the order. Reusing the existing unassigned codes available in the code list is also possible with this feature. Consider this: when a ticket is cancelled or refunded, the ticket information is deleted but the ticket itself is kept. Therefore, the next time you assign a ticket, the system searches for an unused ticket and will assign one if found. Otherwise, it generates a new one.
This allows you to reuse codes (that are unused) for your refunded orders again. The serial code will then be added to the product purchase email in the product table. The default format for the code that is generated is 20 letters long, divided into 4 parts with a delimiter(-). For example, abcde-abcde-abcde-abcde.
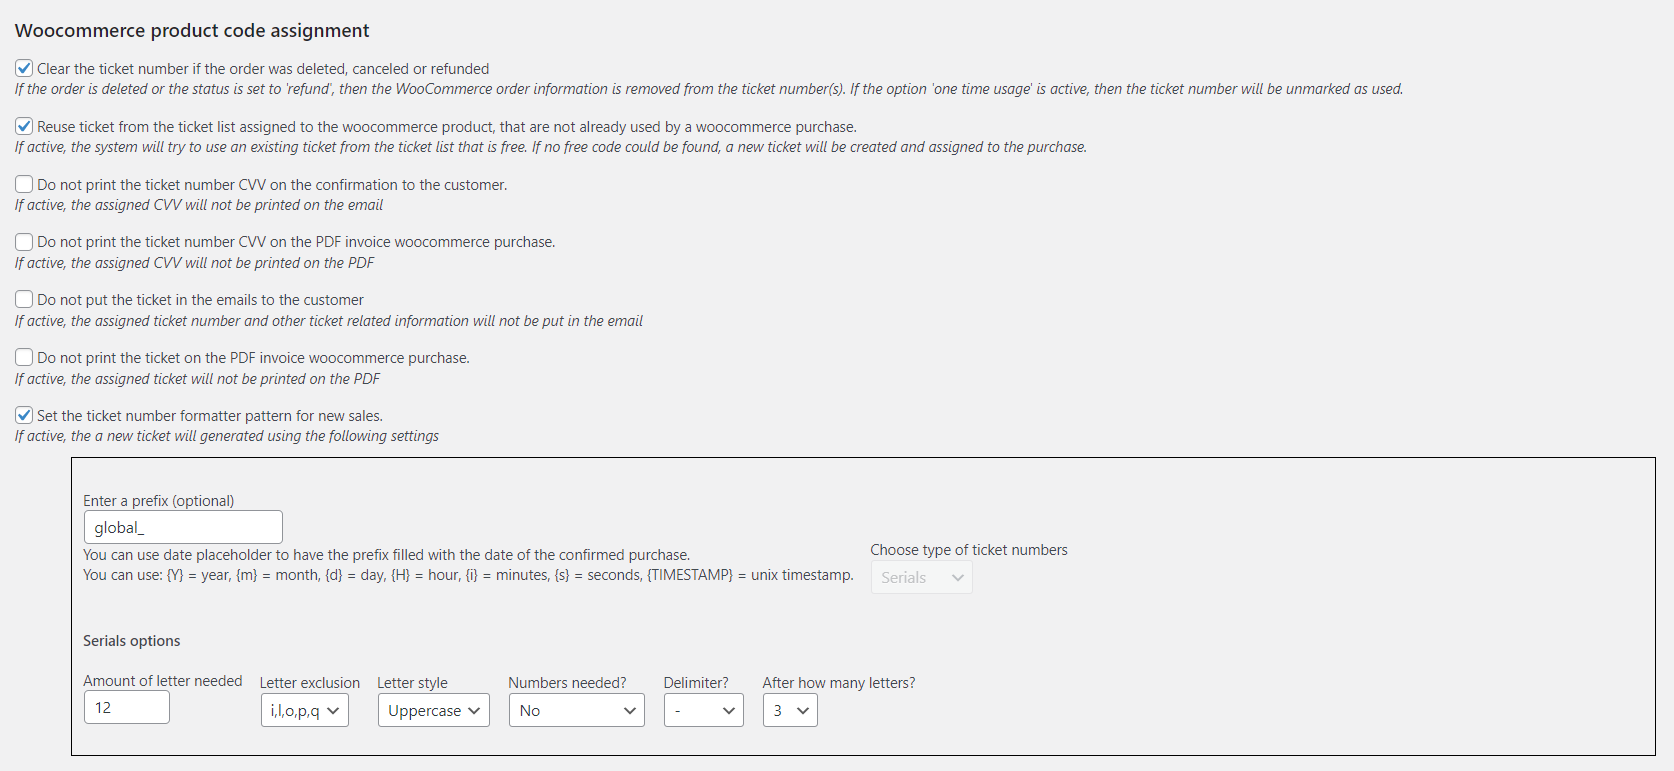
Note that this feature is optional.

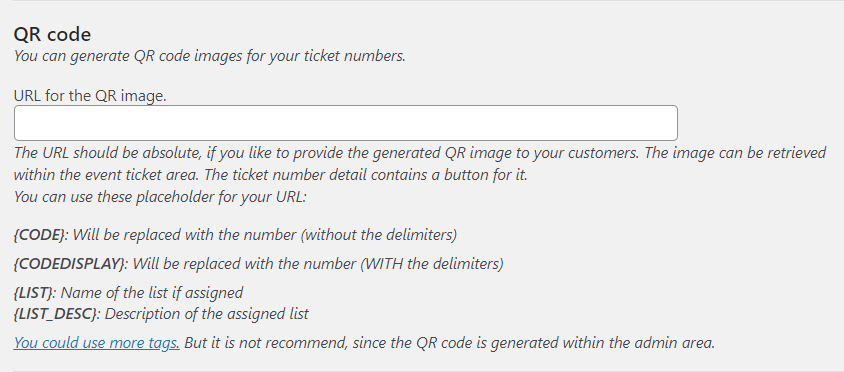
Using this, you can generate QR codes that can be used for your ticket numbers. You can assign the QR a URL in the Options tab under QR Code. You can also use placeholders like
The Replacement tags help you obtain meta ticket values for the text messages and URLs associated with the ticket purchase and redeem it. They include:
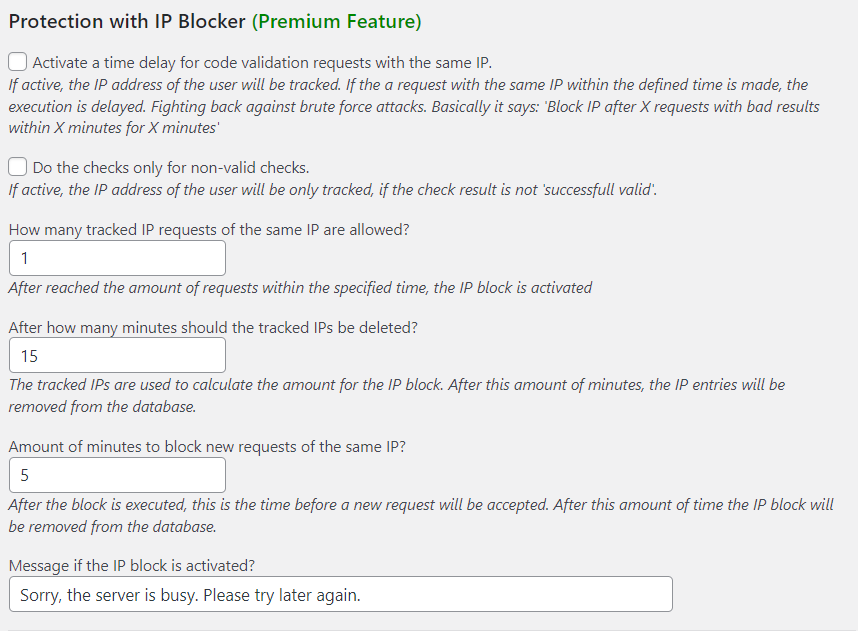
You can activate the IP blocker to protect your server from brute-force attacks. The blocker works by disabling and trying out serial codes until the right one is found.
You can customize the blocking process by specifying details like the number of IP requests allowed, activating a time delay for code validation requests, and displaying a personalized message when the block is activated.
This premium feature allows you to control the validity of your tickets by applying an expiration restriction. Once an expiration check is made, a message indicating the ticket’s expiration is sent to the users.
The expiration counter is triggered after the first successful validation check is made. You can also enable a global expiration date, which applies to all tickets, allowing you to track the old tickets. Consequently, this will impact all validation checks in the future until disabled.
You can enter the days until the ticket expires and also choose to set it for old tickets that exist in your database. Once the ticket is successfully validated, the date will be used to evaluate whether the ticket has expired or not.
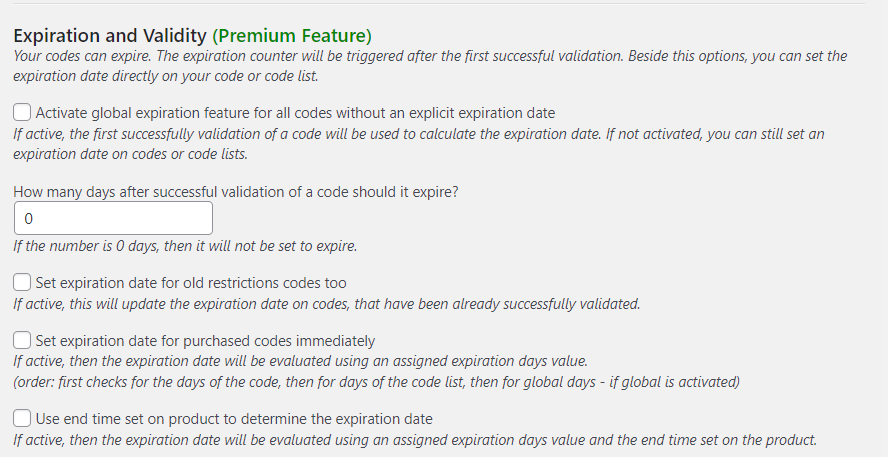
Moreover, you can edit the expiration directly on the ticket, via code list, and on the WooCommerce product.
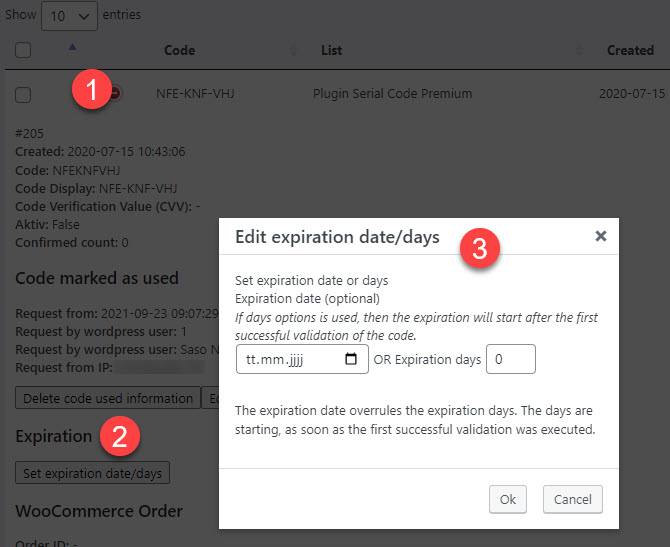
For WooCommerce sales-generated tickets, you can activate the expiration date calculation right from the purchase date. This way your customer will not have to validate them in order to start the expiration countdown.
This feature can also be used for other purposes. For example, you are validating the VIP customers at the entrance of your exclusive VIP lounge. You can control and manage the validity and expiration of the tickets and make the job easier and hassle-free for your employees and yourself.

Copyright 2024 - 2025 © Alle Rechte vorbehalten.
support@vollstart.com